![]() The traditional way to field dress an animal for meat is to gut it and then break it down into the cuts of meat, like we did for a kangaroo in this video. However, in this video tutorial, we show you how to field dress a goat without gutting it, although the technique can be used on any game animal. This is known as the gutless method and provides the same cuts.
The traditional way to field dress an animal for meat is to gut it and then break it down into the cuts of meat, like we did for a kangaroo in this video. However, in this video tutorial, we show you how to field dress a goat without gutting it, although the technique can be used on any game animal. This is known as the gutless method and provides the same cuts.
The gutless method is a great option to use if you’re new to hunting, as some people can find gutting an animal to be messy and a little confronting. The gutless method also makes sense when you have limited time, when there are large predators in the area, or when the weather is too hot to allow the carcass to cool quickly.
We filmed the gutless method of field dressing while attending the Game Hunters Association of Australia Hunter Education course. As well as teaching their members how to field dress an animal without gutting it, their course also covers basic safety principles while hunting, bush navigation, GPS and comms, hunting and camping equipment and loads more. Find out more about the GHAA and their Hunter Education course at the bottom of this page or by visiting their website.
How to field dress using the gutless method
Step 1
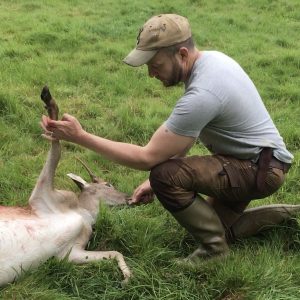
First, you need to make sure that it is safe to approach the animal. It is important to be careful as a wounded animal can cause a lot of damage, especially if it has some decent head gear like horns or antlers.
Approach the animal from behind, prodding it with a stick or the end of your rifle to look for any movement. Pay attention to the eyes of the animal when checking for any signs of life.
Step 2
Once you are sure it is safe to approach, check the animal to determine whether it is safe for eating (see video at 1:30). Animals are not very good at hiding their illnesses so you don’t have to look for any cryptic signs.
Ask yourself the following questions:
- Does the animal look generally healthy?
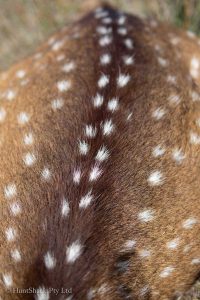
- Does the coat/hide look healthy? If there are patches of missing hair or the hair looks rough and dead, this can be a sign that the animal was not in good condition.
- Are the eyes clear and clean?
- Does the animal have any old wounds or injuries that look to be infected or affecting it’s overall health?
- Do the meat and organs appear healthy and the right colour? The organs should be smooth and not have any lesions on them and the meat should be a healthy red colour.
- Are there any obvious parasites in the meat?
If you are in doubt, leave the animal. You won’t meet many hunters who enjoy wasting a valuable resource like game meat but you should never feel the need to make yourself sick in order to achieve that.
Step 3
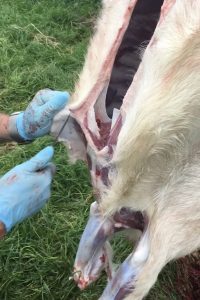
To start field dressing your animal, you want to place the foot/hoof of the rear leg in between your knees to create some tension on that leg (see video at 4:15).
Make an incision in the skin down the middle of the inside of the leg. Be careful not to cut into the meat – you just want to cut through the skin. Your knife should be tip downward with the blade facing away from you.
Continue the incision until you reach the point on the belly in between the two rear legs. You can remove any external genitalia at this point.
While still using your knife, start making long incisions between the skin and the meat to separate the two. Work slowly from the foot down the leg.
Once you have an inch or so of skin back from the incision freed from the meat, you can use your thumb to start manipulating the hide away from the leg. The skin should come free from the back of the leg without much help from a knife.
Step 4
Now you can remove the back leg from the carcass (see video at 7:30). Following the seam along the inside of the animal’s hip, use your knife to work your way down to the ball joint.
There is a small tendon inside the ball joint that you need to cut with the tip of your knife. You can then cut through the rest of the meat to completely separate the rear leg.
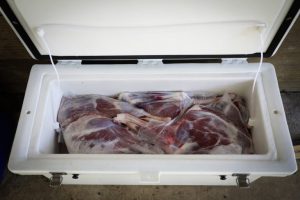
Make sure to put the leg into a bag or esky to keep it covered and clean. Using the skin from the leg as a kind of flap, you can cover the exposed hip joint on the carcass to keep flies away while you work on breaking down the rest of the animal.
Step 5
Moving up to the front shoulder, take the front foot of the same side of the animal and place it between your knees (see video at 8:44). Make an incision in the skin down to the mid-point on the chest between the two front legs.
Just like you did on the rear leg, use long straight sweeps with your knife to start separating the skin from the meat on the leg. You can then use your hands to separate the skin from the back of the front leg.
The skin around the brisket and chest can be quite tough to remove from most animals so you may want to use your knife for that part.
Step 6
There is no bone that connects the shoulder to the body of the animal – just connective tissue (see video at 10:38). Using the foot, pull the shoulder out and away from the animal to expose the seam on the inside of the front leg. Start cutting down along that seam with your knife until the shoulder is freed from the body.
Place the shoulder in a bag or esky to keep it clean and covered.
Step 7
Repeat steps 3-6 to remove the other two legs from the other side of the animal.
Step 8
Turn the animal onto its belly so that you can get access to the spine and remove the backstraps (see video at 13:30). Make an incision in the skin from the base of the neck down the spine towards the hip bones. Keep your blade as close to the spine as possible. Slowly peel the backstrap out using long, slow sweeps with your knife blade down the length of this cut of meat.
The backstrap is quite a lot longer than most people realise. It starts up at the base of the neck and goes all the way down to the top of the hip joint. Having removed the rear legs and shoulders beforehand, you should be able to remove the backstrap in one complete piece.
Repeat the same process on the other side of the spine to remove both backstraps from the animal.
Step 9
You can remove the inner tenderloins of the animal now that the backstraps are out of the way (see video at 16:18). They lie up against the inside of the spine on the back wall of the abdomen.
You can reach them without gutting the animal through a spot called the ‘hungry hollow’. It is the spot between the hips and the ribs underneath the spine. It should be exposed already.
Use your knife up against the inside of the spine to start separating the inner tenderloin on one side. Once you have it lifted a little, it should just pull away from the spine. Repeat for the other side.
Step 10
You can also remove the meat from around the neck of the animal (see video at 16:50). This is a great cut for mincing and slow cooking. Start by continuing the cuts you made in the hide to access the backstraps up the length of the neck to the base of the head.
Peel the hide away from the meat with your knife or by ‘punching’ it out with your hand. You can then slowly start removing the meat by working your way around the neck. Repeat for both sides.
 Game Hunters Association of Australia
This video was filmed while attending the Game Hunters Association of Australia Hunter Education course. This is a 2-part course that covers the following topics:
- GHAA Club rules
- GHAA club Properties rules and information
- Private land hunting in Australia
- Understanding Farms and Farmer Relations
- Firearm Familiarisation and Safety
- Hunting and shooting safety
- Bush Navigation and safety
- Use of GPS and UHF radios – mandatory on GHAA properties
- Hunting and shooting equipment
- Selecting Firearms and ammunition for purpose
- Game animal harvest and butchering
- Target animal species information
- Trail Cameras
- and lots more
The course is a great opportunity to refresh existing skills and learn new ones that are not taught during firearms safety courses. Whether you are a brand new hunter or have been hunting for years, we highly recommend having a look at the GHAA Hunter Education course.
Doing the course also gives you access to private property to hunt on which counts as a genuine reason for obtaining a firearms licence in QLD. They have access to thousands of acres for hunting game and feral species that would be otherwise difficult to access in QLD where public land is essentially locked up. You can find out more on their website.
You can also listen to our podcast with Steve Hall, the President of GHAA.